
Grow Guide.
Premium mushroom grow kits.
Selected language:
Manual
Introduction
Manual for the 1200 cc grow kit.
We're glad you chose our Royale Flush magic mushroom grow kit, the kit that allows you to grow potent mushrooms at home in a simple and controlled way. Our kits are designed with a specially formulated compost substrate and carefully selected genetics for optimal yield and potency. The unique substrate provides the nutrients the mycelium needs to grow strong and produce multiple flushes.
Why Royale Flush is the right choice.
- High-quality genetics: Selected for maximum stability and consistency.
- Unique compost substrate: Rich in nutrients, designed for high yields.
- Easy use: Suitable for beginners, without complicated steps.
Preparation
Create a clean environment in the right location
It is important to create a clean environment to prevent contamination. Dust and dirt can contain harmful bacteria that interfere with the growth of your mushrooms. With a clean space, you guarantee healthy and vigorous mushrooms. Our kits are pre-inoculated, meaning they are ready to use immediately without the need for spores or injections.
Be sure to place the grow kit in a semi-shaded area without direct sunlight. Direct sunlight can dry out the mycelium and make the temperature too high, which can interfere with growth. The ideal temperature for growth is between 20-24°C. Use a thermometer to monitor the ambient temperature. If necessary, you can use a heat mat with a sensor to keep the temperature stable. If you use a heat mat, make sure you place the sensor in the middle between the mat and grow kit.
The first phase
Step 1: Placing the grow kit.
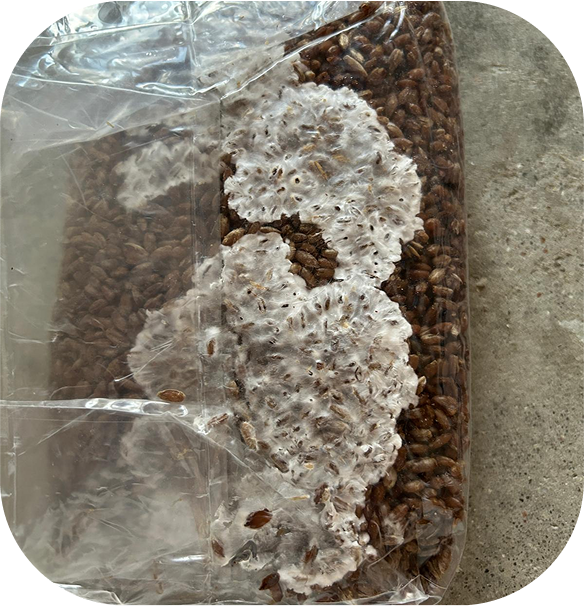
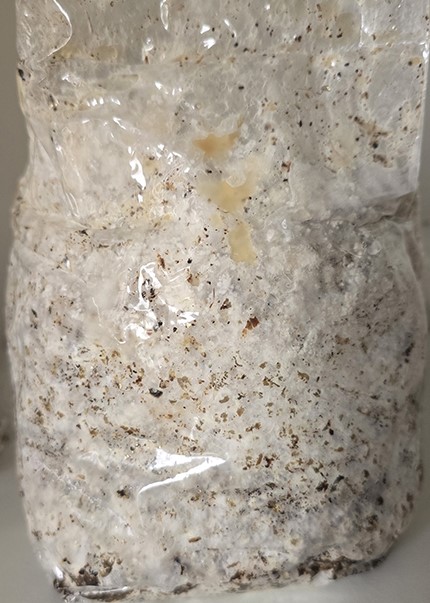
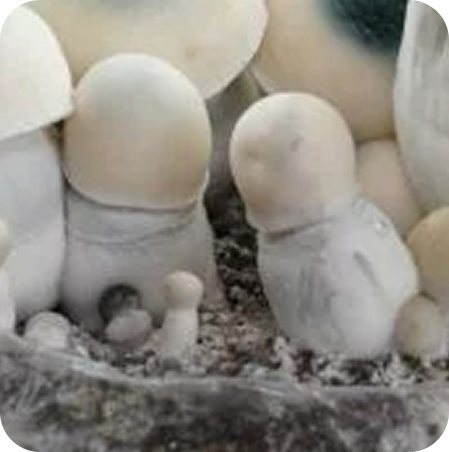
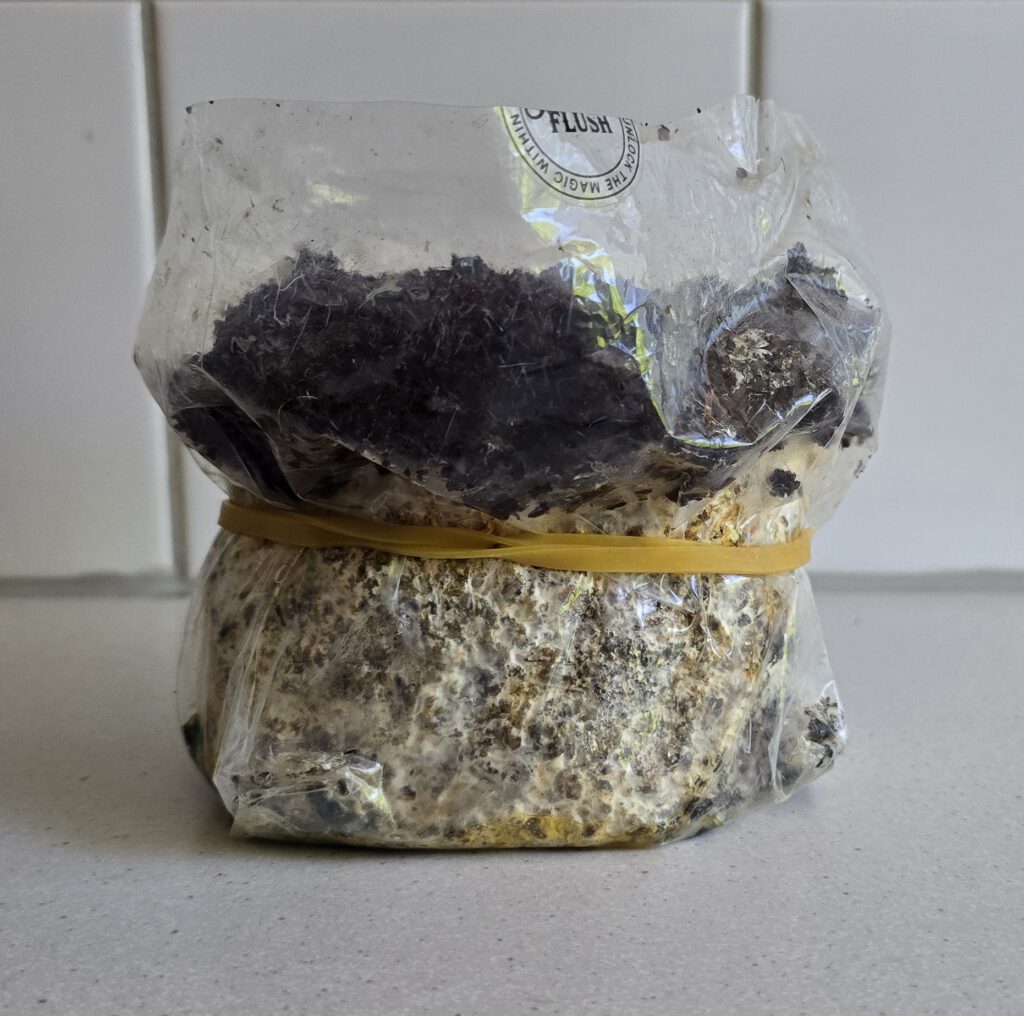
Remove the grow kit from the box and leave the bag completely closed. Place the grow kit on your prepared growing spot. Now the waiting begins until the mycelium covers about 30-40% of the substrate. This may take several days to weeks, depending on conditions.Use the image below as a guide. When the mycelium has the right coverage, go to step 2.
The first phase
Step 2: Mycelium mixing.
Once 30-40% of the substrate is covered with white mycelium, you can mix the substrate with the mycelium. This helps the mycelium to spread quickly and evenly. This encourages the growth of mushrooms in multiple spots, leading to a faster and larger harvest.
2.1 Feel the density of the substrate
Before mixing, feel what the density of your substrate is. You can do this by gently squeezing it. Try to remember what the density is approximately. This is because after mixing, we are trying to get the substrate back to approximately the same density.
2.2 Let air into the bag
Just above the substrate, on opposite sides, grasp the bag between your thumb and forefinger. Slowly pull your hands 10 to 15 centimeters apart. As the bag vacuums, "clear the way" to the air filter. Keep slowly pulling the bag apart to pull air through the filter into the bag.Do this until you have about a liter of extra air in the bag.
2.3 Break the substrate and mycelium
Squeeze the substrate until it begins to loosen. The mycelium will have formed clusters. You want to break these clusters into as small pieces as possible. You can do this by squeezing it. Do this until both substrate and mycelium are completely loose.
2.4 Mix the substrate and mycelium
The goal is to mix the mycelium through the substrate as completely as possible. You can shake, gently knead and pull apart the bag for this purpose. Be careful to damage the bag as little as possible. After about 1 to 2 minutes of mixing, the mycelium will be completely mixed through the substrate.
2.5 Compact and place back
Make sure all the substrate is at the bottom of the bag and return the bag to its original shape. Press the substrate with both hands until it has the same density as in step 2.1 You can now put your grow kit back on your growing site. Now wait until the substrate turns completely white. You will see the mycelium grow by the day.
The first phase
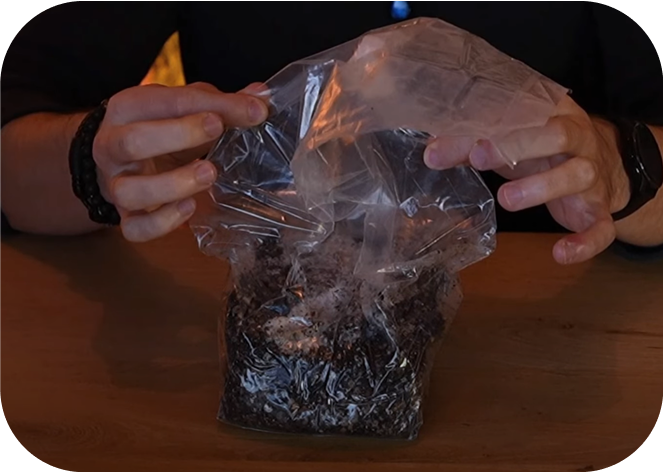
Step 3: Soak and prepare.
CAUTION!
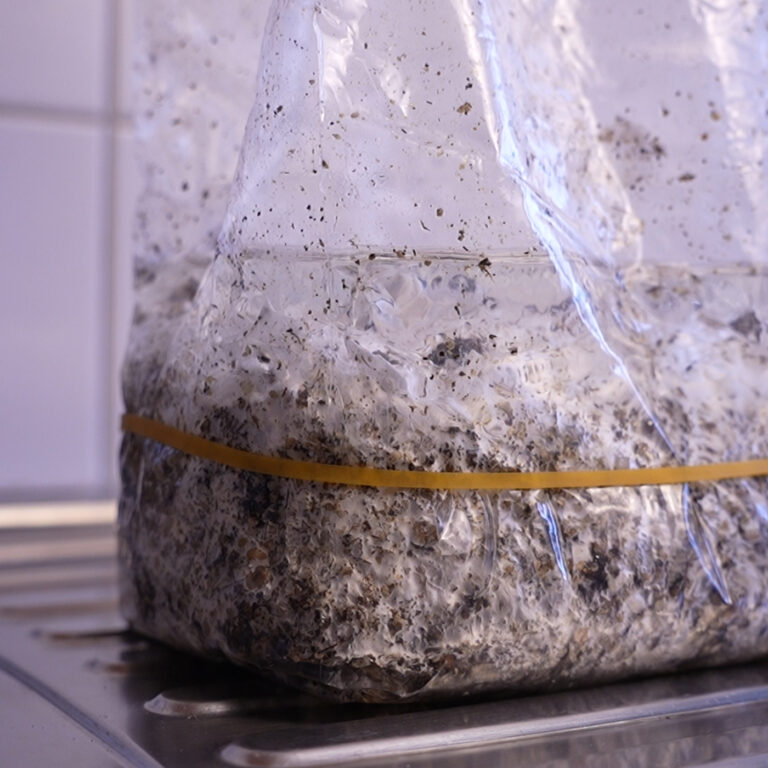
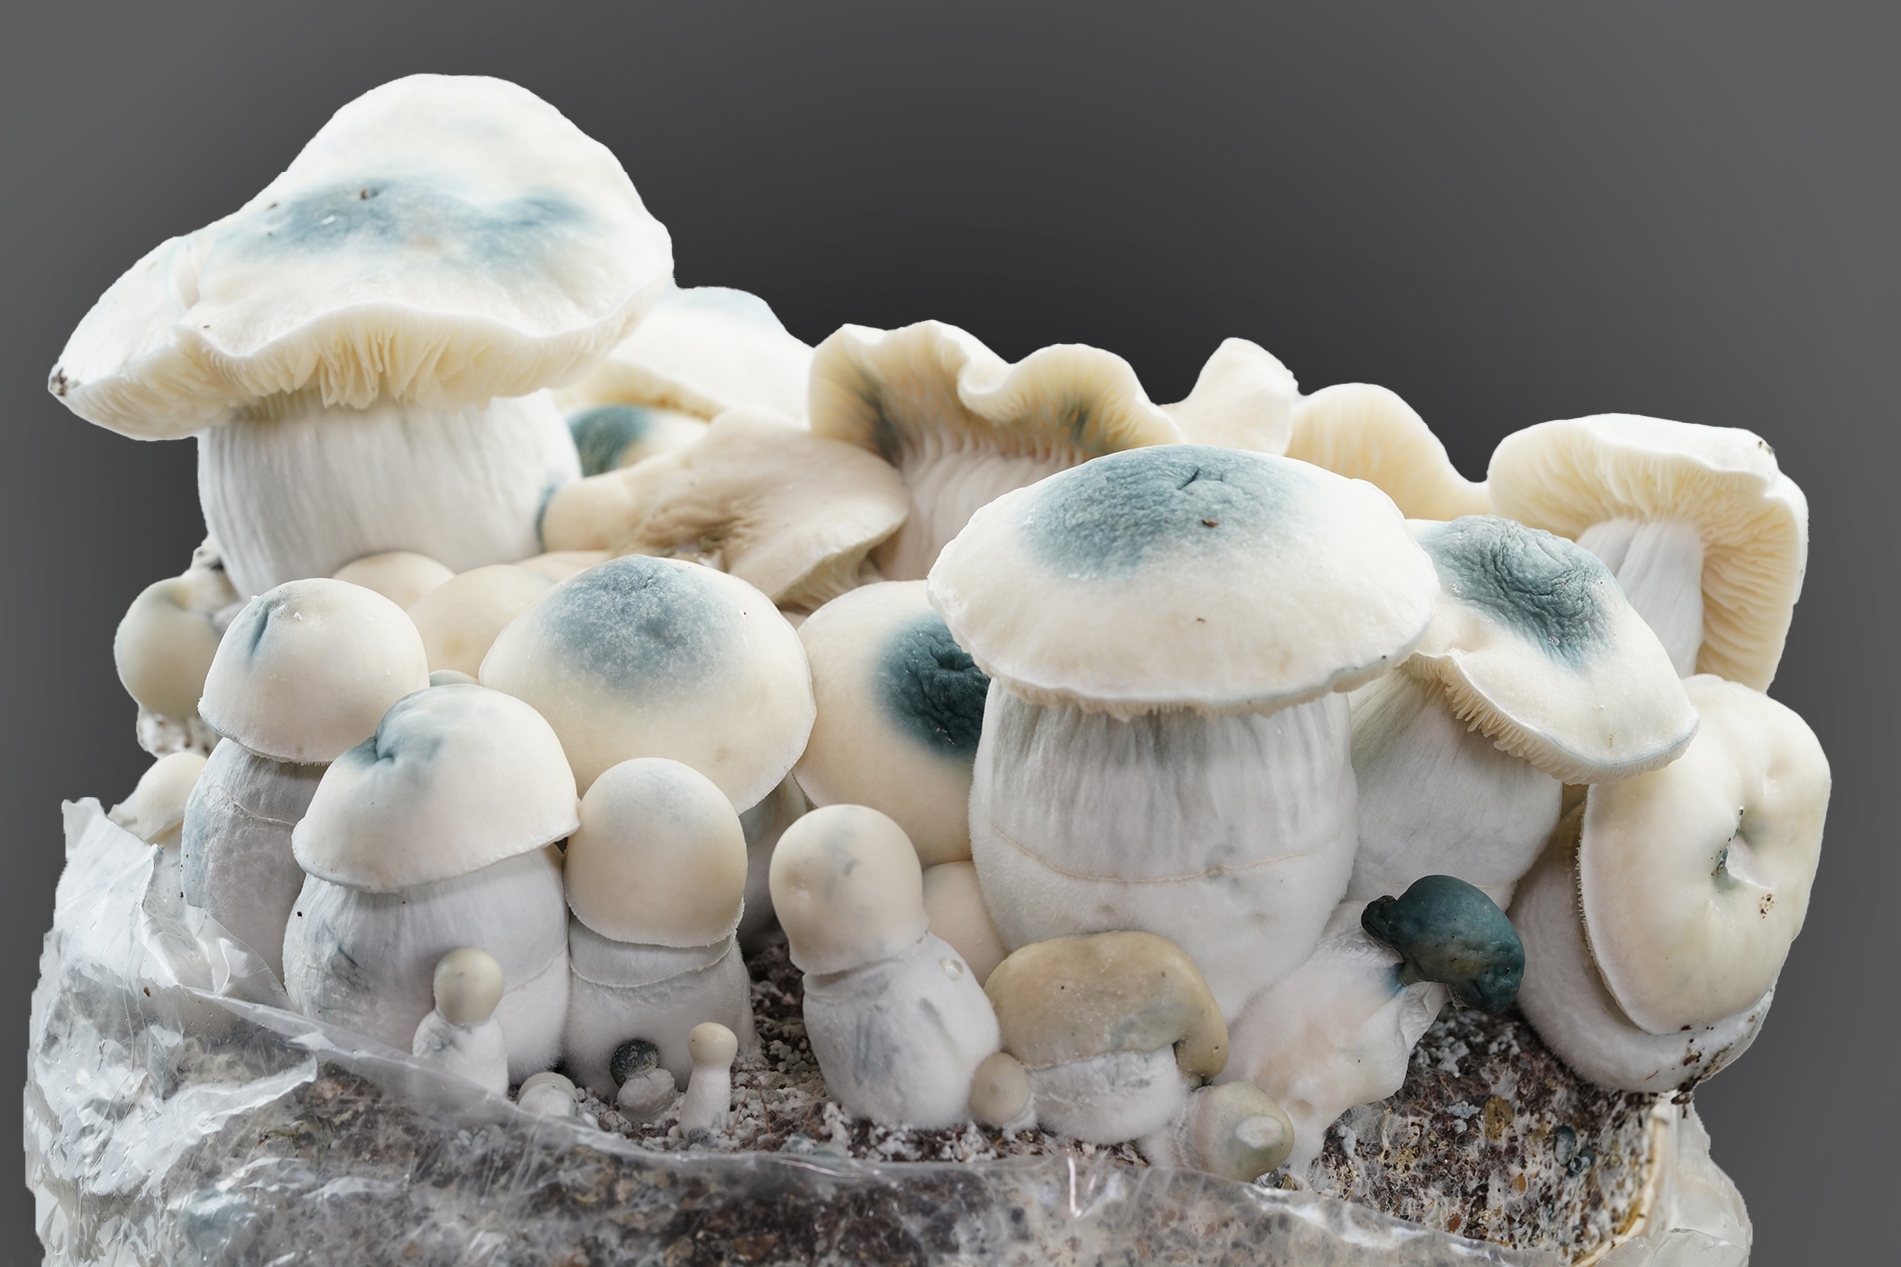
Make sure the grow bag is completely covered with white mycelium (use the image above for reference) and then it has had a week to get stronger. If you see spots larger than a few inches that are not yet covered with white mycelium, wait a little longer. When everything is completely white you can start soaking.
Is your kit not quite white yet? Then wait until you move on to this step. Have you been waiting for weeks? Then check that the temperature is right (between 20 and 24 degrees). Patience will be rewarded.
You need the following things:
- Clean hands
- Clean sink
- Clean scissors
- Elastic (out of the box)
- Clip (out of the box)
Clean your sink thoroughly. Make sure you have scissors handy. The scissors should also be thoroughly clean.
3.1 Place the rubber band.
Take the rubber band provided and put it around the grow bag, around the substrate, about 2 to 3 inches away from the top. The rubber band will ensure that your substrate will not float upward later.
3.2 Cut open the grow bag.
Take your clean scissors and cut open the top of the grow bag. In a straight line, just below where the grow bag is sealed, cut open the entire bag.
3.3 Fill the grow bag with water.
Place the grow bag in the sink. Open the grow bag and fill it with cold water. Make sure the mycelium is under about 5 centimeters of water. So the water will be at about 15-20 centimeters height, from the bottom of the grow bag.
3.3 Soak the mycelium for 24 hours.
Fold the top of the bag twice and close it with the clip. If you do not want to leave the bag in the sink, it is recommended to place the bag on a plate or baking dish. Water may leak through possible micro holes in the bag. Now leave the mecelium in the water for 24 hours. Once the 24 hours has passed, open the bag and pour the water down the sink.
3.4 Seal the bag and replace.
When all the water has been drained, let air into the top of the bag and close the top with the clip. It is not necessary to seal the bag airtight. The bag is allowed to breathe a little. Soaking is now successful and you may place the grow kit back on the growing site.
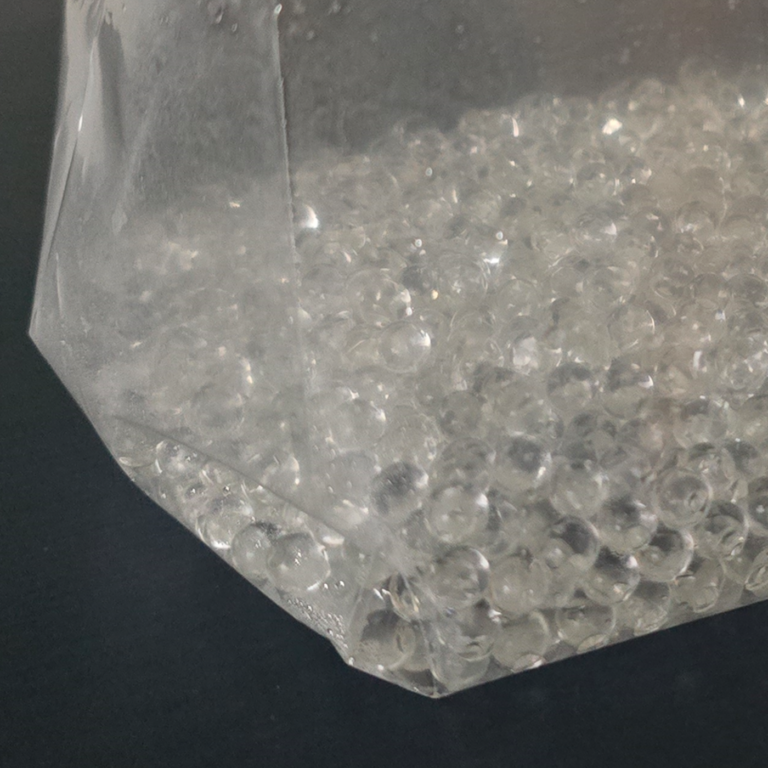
3.5 Prepare the outer bag.
Take the outer bag out of the box. Fill the bag with the included water pearls. Add 450 ml of lukewarm water and let the pearls soak for at least 2 hours to absorb all the water.
3.6 Cut the growing bag.
Take the growing bag and cut the top of the bag to about 3 cm above the substrate. (See photo at 3.7)
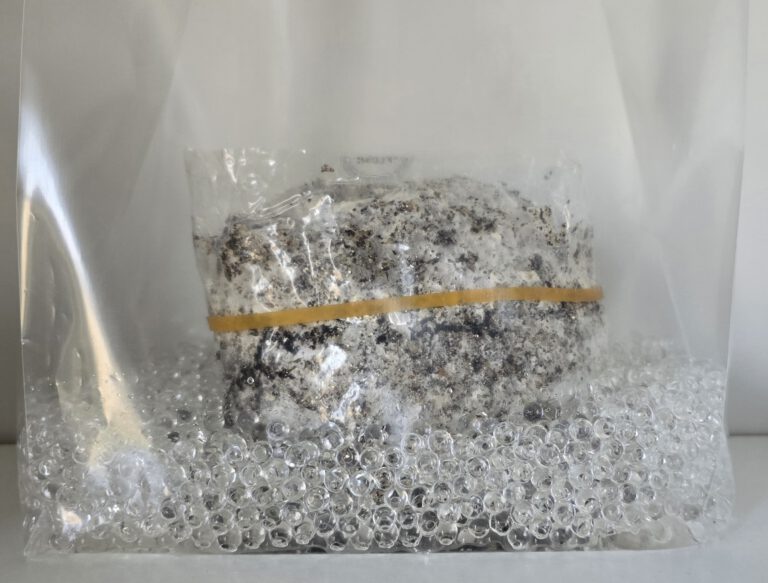
3.7 Place the grow bag in the outer bag.
Place the grow bag in the center of the outer bag, between the water beads. Make sure the water beads do not make direct contact with the substrate. Fold the top of the outer bag closed and close it with the clip. You have now created a self-regulating microclimate. The water beads will keep the humidity at the right level.
Maintain and grow
Daily maintenance for best results
The key to a successful mushroom harvest is the right temperature. Ideally, keep the grow kit at 24°C. At this temperature, the first harvestflush) will appear after about 1-3 weeks. If the ambient temperature is around 21°C, it can take up to two weeks longer. Are you using a heat mat? Then use a thermostat and place the sensor under the bag and set the maximum temperature to 24°C.
For better and bigger harvests, open the bag twice a day for a minute to let fresh air in.

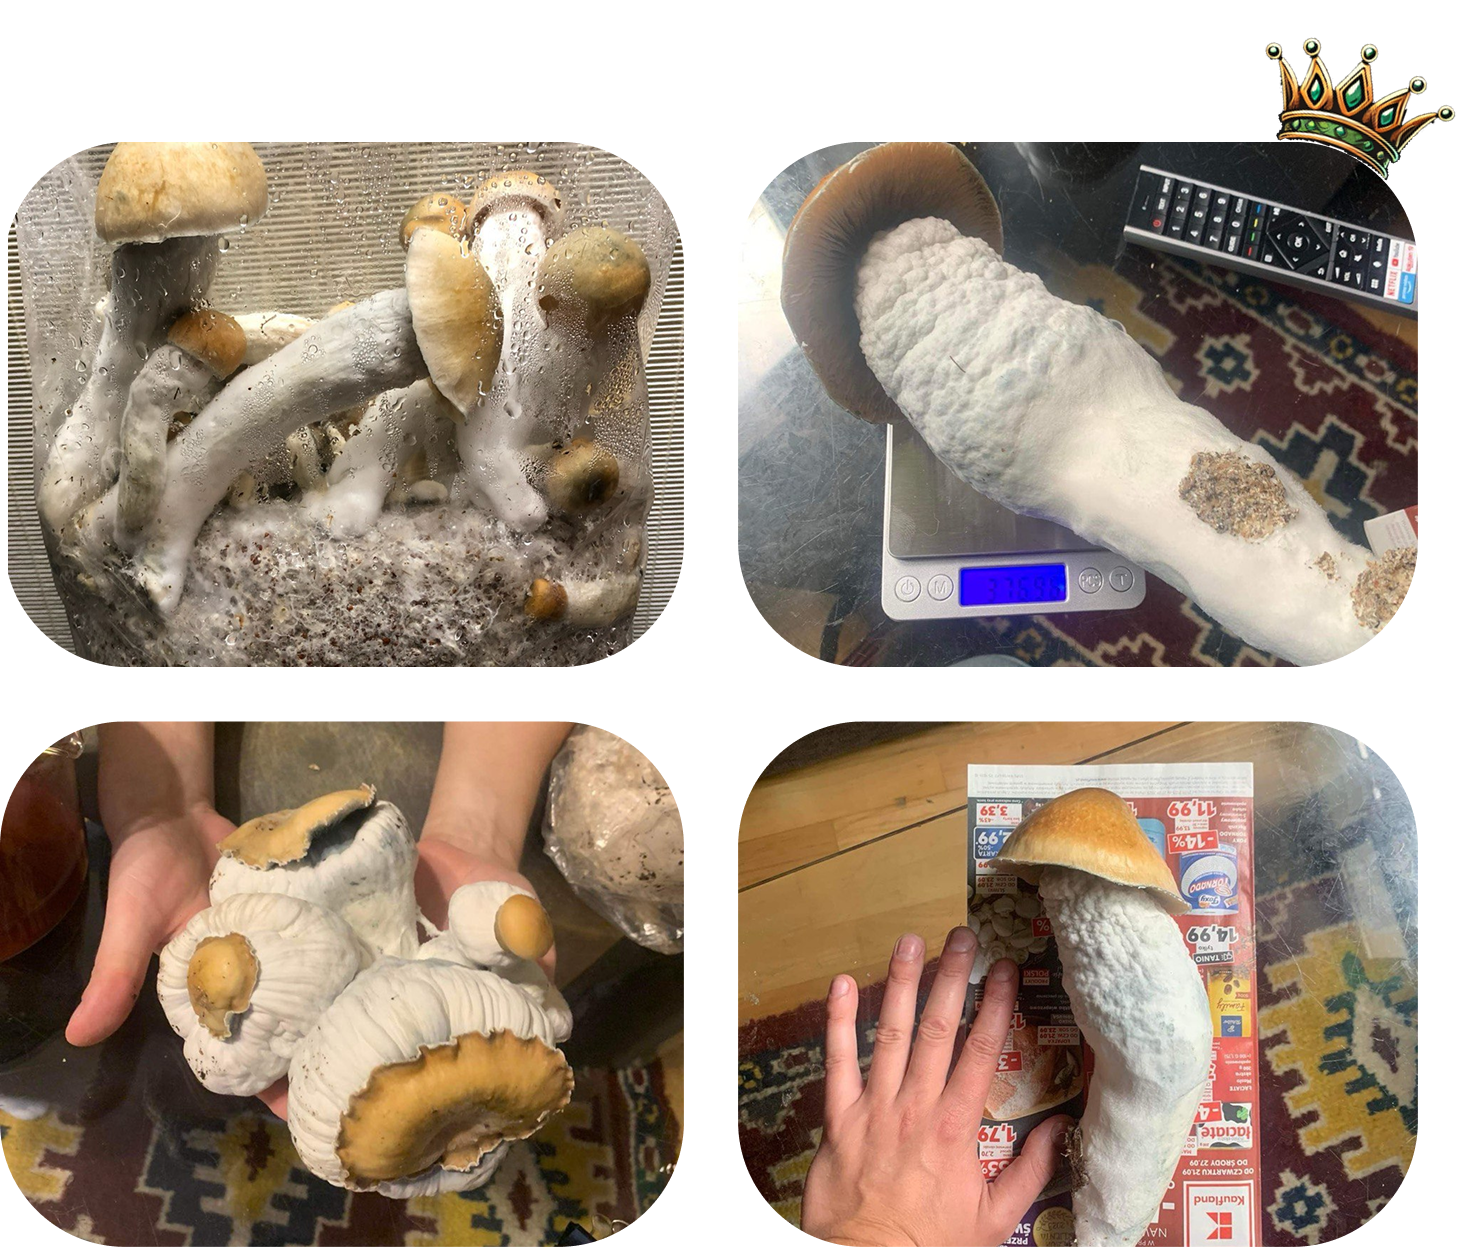
When to harvest
How do you know when it's time to harvest?
Harvesting your mushrooms at the right time ensures the best quality, potency and overall experience. This is how you determine the perfect moment:
Pay attention to the growth stage
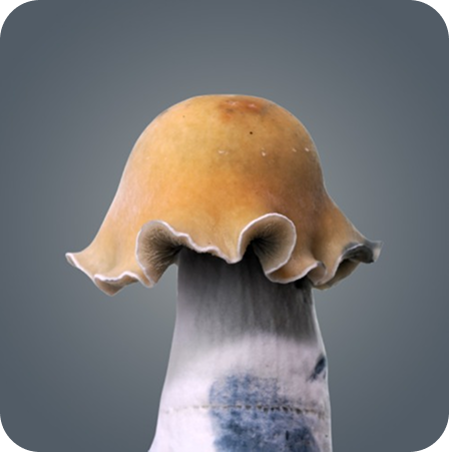
In varieties with a veil (veil), harvest just before the veil under the cap begins to tear. This is the time of maximum maturity and potency. For species without a veil or that do not release spores, watch for size and development. Harvest when the mushrooms appear fully mature, with well-shaped hats and firm stems.
Not ready yet
Ready
Too late
Color and texture
A darker color may indicate maturity, especially in species known for their deep hues. Do the mushrooms feel soft or brittle? If so, they may be overripe. Harvest when they are still firm but pliable.
Size and appearance
The mushrooms should look full and healthy, with vibrant, firm hats. Do not let them grow too large, as this can cause a deterioration in quality and texture.
Check daily
Mushrooms grow quickly-sometimes within hours. Check your grow kit regularly as soon as harvest time approaches so you don't miss the ideal harvest moment.
Harvesting the first flush
It's time to reap the rewards of your efforts!
When your first harvestflush) is complete, roll the bag down and avoid touching the substrate directly with your hands. Working hygienically is essential, so wash your hands and make sure your surroundings are clean.
Use a clean and sharp knife to cut the mushrooms as close to the substrate as possible, without damaging the substrate. Indeed, damage can delay subsequent harvests.
You can sterilize your knife by holding it in the blue flame of a gas burner or stove and then letting it cool, or by cleaning it with isopropyl alcohol (at least 70%).
Preparing for the next flush
Repeat this step after each harvest
1. Re-soaking the grow bag
After harvesting, fill the grow bag with water and let it soak for 24 hours. Keep in mind that there may be small holes in the bag, so place the bag on a deep plate to prevent leakage.
2. Add Flush Booster
Take the Flush Booster out of the box. Our Flush Booster is a special coconut substrate enriched with the right nutrients. Add about 50ml of water to the Flush Booster and wait for the coconut to absorb the water. Keep adding water until it no longer absorbs water. Now squeeze any remaining water from the coconut. If you gently squeeze the coconut you want a few drops of water to come out, if you squeeze it hard more water should come out noticeably. When you have achieved this, the coconut has the right moisture. So it should be well moist, but not very wet.
Now place a layer of about half to one inch of the Flush Booster on top of the substrate of your grow kit. Lay it loosely on top. So you don't have to press it down. After adding the Flush Booster, place the grow bag back into the outer bag, seal it and continue your care routine to achieve a healthy and strong next east.
Additional information
Troubleshooting
Coming soon
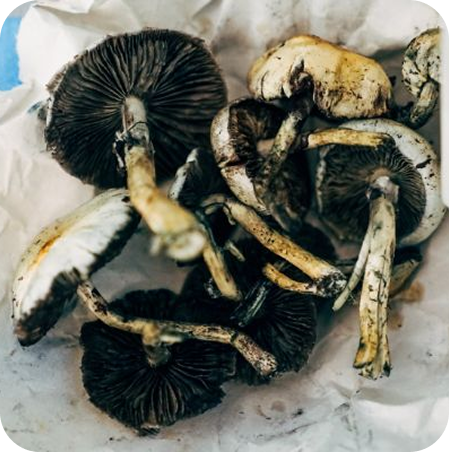
Drying and storage
Dry your mushrooms to preserve them for a long time
For drying, use a food dryer set at 70°C, or let the mushrooms dry naturally on a heat mat or in a well-ventilated room. You know they are completely dry when the stems break like dry twigs when you bend them. Properly dried mushrooms can then be stored.
Ground mushrooms for long-term storage
Grinding your dried mushrooms is the best way to extend their shelf life. Once ground, pack the mushroom powder in vacuum-sealed bags to prevent exposure to air. This step is crucial because psilocybin oxidizes when exposed to oxygen, causing it to lose potency over time. By storing them without air, your mushrooms will remain potent much longer.
Blue Honey method
Another excellent method for long-term storage is to make "blue honey." Honey acts as a natural preservative and stops the oxidation process of psilocybin. To make blue honey, mix finely ground mushrooms with honey. This mixture lasts for years and preserves the potency of the mushrooms.
Responsible use
Discover the true power of your Royale Flush mushrooms
When using magic mushrooms, a gentle build-up in dosage is essential. Start with a low dose and gradually increase, so you can discover what feels comfortable and safe for you. Magic mushrooms can provide powerful, introspective experiences, so take your time and give yourself space to get used to them slowly.
Dose
For beginners, we recommend using increments of 0.4 grams (dried weight). This helps you dose carefully without suddenly having an experience that is too strong. Finding the right dose can vary from person to person, so listen carefully to your body and take your time to determine what works for you.
Set and Setting
The environment in which you use magic mushrooms is very important. Preferably choose a quiet, familiar place, for example in nature or another environment where you feel safe. Avoid crowded places and make sure you are not disturbed. A calm environment helps you feel more relaxed and open, which contributes to a positive experience. Also, make sure you have plenty of time and no obligations so you can fully focus on the experience.
Safety
Take a friend with you who is not under the influence, especially if this is your first time using. This provides extra safety and support when you are struggling for a while. Bring some sweets, orange juice or chocolate bars, as glucose and vitamin C can help reduce the effects of the trip if needed. Avoid combining with other substances or alcohol, and listen to your body.If you feel a little nauseous after consuming the mushrooms, which is a common effect, eating a banana or some ginger can bring relief.
Trip tips
Preparing yourself for a positive experience
A good mindset is essential for an enjoyable and meaningful trip experience. Below are some tips to help you prepare mentally and stay in the right mood during your trip. These positive affirmations and activities can help take your experience to the next level.
Before your Trip: Prepare with Positive Intentions
Repeat to yourself some powerful affirmations such as:
"I am safe and allowing myself to fully enjoy this experience."
"I am open to all that this trip has to offer me."
"My mind is calm, my heart is open and I trust in the magic of the moment."
Create a Comfortable Environment: Make sure your environment is clean and quiet.
Create a nice atmosphere with soft lighting, a blanket, and perhaps some soothing music. The safer and more comfortable you feel, the nicer the trip will be.
Meditate: Before your trip, take a few minutes to meditate.
Focus on your breathing, feel your body relax and release any stress. This will help you start your trip calm and open.
During your Trip: Stay in a Good Mindspace
- Breathing exercises: If you find yourself feeling uncomfortable, try slow and deep breathing. Focus on your breathing to regain calmness and control. A simple breathing technique is to inhale for 4 seconds, hold for 4 seconds and exhale for 6 seconds.
- Positive Visualizations: Imagine you are in a beautiful place - such as a sun-drenched beach or a peaceful forest. Let your imagination run wild and enjoy the positive images your mind conjures up.
- Affirmations during your Trip: When your thoughts become chaotic, you can fall back on positive affirmations:
- "I am in harmony with myself and the world around me."
- "I am experiencing only love and light."
- "This trip brings me closer to myself." - Do Something Creative: Grab some drawing supplies or put on soft music and let yourself get creative. Drawing, coloring, writing or even dancing can all help channel your energy into something positive and meaningful.
- Contact with Nature: When you are outside, try to experience nature. Feel the grass under your feet, listen to the birds, watch the clouds. Nature can offer deep connection and peace during your trip.
- Trust the Process: If you find yourself stuck in a negative thought, remind yourself that everything is temporary. Surrender to the process and trust that things will work out. Remind yourself that you are safe and that everything you experience is part of the journey.
After the Trip: Reflection and Gratitude
After your trip, it can be nice to write down your experiences. What did you learn? What insights did you gain? Reflect on these moments and feel gratitude for what you experienced.